RAP Basics
- Find key items
- Help text and videos
- Identify what action is needed
- Open an item awaiting your action
- View the submission history
- Find a submission
Getting Started for Reviewers
- Review a submission
- Access a submission
- Find a submission
- Review submission pages
- Track your review progress
- View experiment details
- View procedure changes
- View documents attached to a submission
- Print submission pages
- Add reviewer notes to submission pages (for Designated Member Review)
- Send change requests to PI
View changes to a submission
- View responses to a clarification request
- View the change log
- View changes between two versions of a submission
- Add comments to the submission
- Submit an ancillary review (Pre-Review)
Submit a Designated Member Review (DMR)
Complete a Full Committee Review (FCR)
RAP Basics
When you first log in to RAP, you will be on the Dashboard page, which is the starting point for finding items and performing many basic tasks.
Find key items
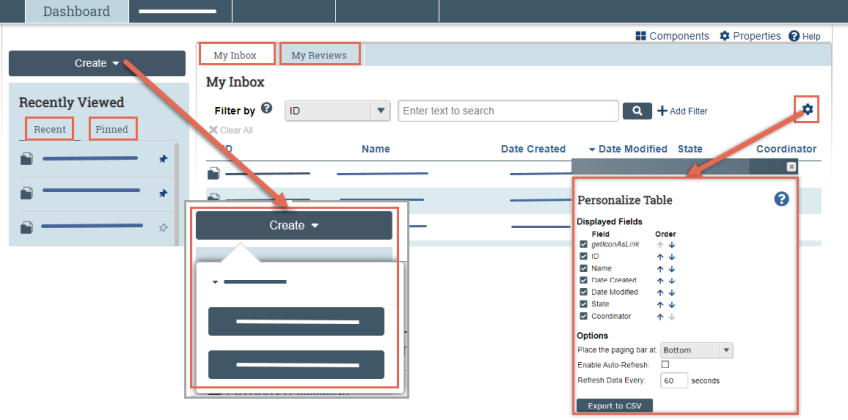
From your Dashboard, you will see:
- My Inbox: Items that require you to take action.
- My Reviews: Items assigned to you to review. These are a subset of the items in My Inbox.
- Create menu and buttons: Actions you can perform. The menu will not display if you do not have access to any buttons.
- Recently Viewed:
- Recent: The last several items you viewed. Scroll through this list to find an item you worked on recently.
- Pinned: You can pin the items in Recently Viewed section for quick and easy access. This is where those pinned items are listed.
- Personalize Table: You can alter the tables displayed on the dashboard by using the Personalize Table gear icon.
Help text and videos
- The magnifying glass icon on SmartForm and activity Views leads to help for areas across the system.
- In the larger page areas, this help often contains videos and text from the product on how to navigate the system.
- In the protocol questions, this icon will bring up the UO-specific help text.
- If you have suggestions on how to revise or improve these help topics, please contact the IACUC Office.
To identify what action is needed
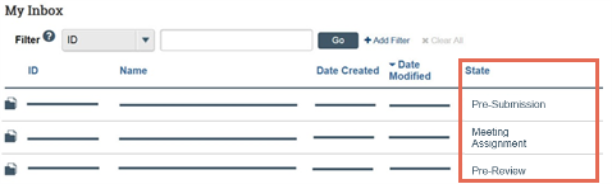
- Review the State column of the items in My Inbox.
- The state gives information about what your next steps are. For example, the Pre-Submission state means you have not submitted the record. You can open and finish the record, and then submit it for processing.
Open an item awaiting your action
- From My Inbox, click the submission name and the submission workspace will appear.
Tip: A list of activities you can perform appears on the left.
View the submission history
- From the submission workspace, click the History tab. You can view the list of actions performed on the submission to date, including comments or links to view more details for each action.
Find a submission
- In the Top Navigator, click IACUC.
- On the Submissions page, click the tab matching the state of the submission you wish to find.
Tip: If you do not know the state, click the All Submissions tab. - Click the name of the submission in the list. This will make the submission workspace appear.
Getting Started for Reviewers

Review a submission
- Find your review assignments. To access submissions assigned to you, log into IACUC system. The IACUC dashboard should appear. If not, click Dashboard in the Top Navigator.
Identify the reason the submission appears in My Inbox by looking at the State column.

- Click the name of the submission to open it. You can then view the details of the submission using the appropriate View button.
- Open the submission and review the details.
Access a submission
- Find the submission.
- Click the name of the submission to open it.
Find a submission
For | Check | How to find this list |
|---|---|---|
Submissions assigned to you:
| My inbox | When you log into the IACUC system, you will be on the General Dashboard page. If not, click Dashboard on the Top Navigator. |
Submissions that are:
| IACUC Submissions In-Review tab | Click IACUC on the Top Navigator, then click Submissions and select the In-Review tab. |
Approved submissions | IACUC Submissions Active tab | Click IACUC on the Top Navigator, then click Submissions and select the Active tab. |
Discarded or closed submissions | IACUC Submissions Archived tab | Click IACUC on the Top Navigator, then click Submissions and select the Archived tab. |
All submissions you have permission to view | IACUC Submissions All Submissions tab | Click IACUC on the Top Navigator, then click Submissions and select the All Submissions tab. Tip: Try filtering this list by the protocol name. Next to Filter by, select Name. Type the beginning of the name. Click the magnifying glass. |
Review submission pages
- Open the submission you want to review.
- On the submission workspace, click Review (Review Protocol, Review Amendment, etc.).
- Review the submission. You can scroll through the submission or use the Left Navigator to jump to specific sections of the form.
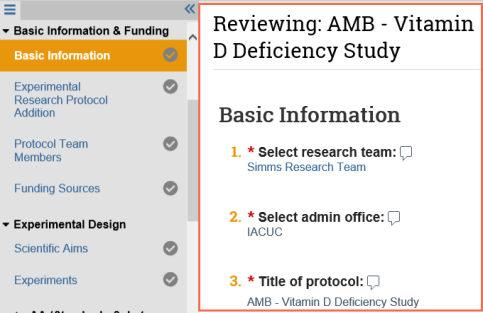
Track your review progress
- As you review a page or section, select the check box at the bottom to indicate you have reviewed it.
- The page turns green and so does the check mark next to the page name on the Left Navigator.
During the review process:
- If you close the submission, the check boxes, green highlighting, and green icons remain so you know where you left off when you return to the submission.
- If anyone updates submission pages during the review process, the green check mark is removed from the page indicating that you need to review it again. Additionally, an edit icon appears on the Left Navigator indicating the page was changed.
- Note: The Review Tracker feature does not stop a submission from moving forward in the review process—for example, if check boxes are missed or you choose not to use this feature.
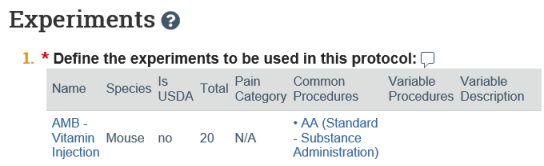
View experiment details
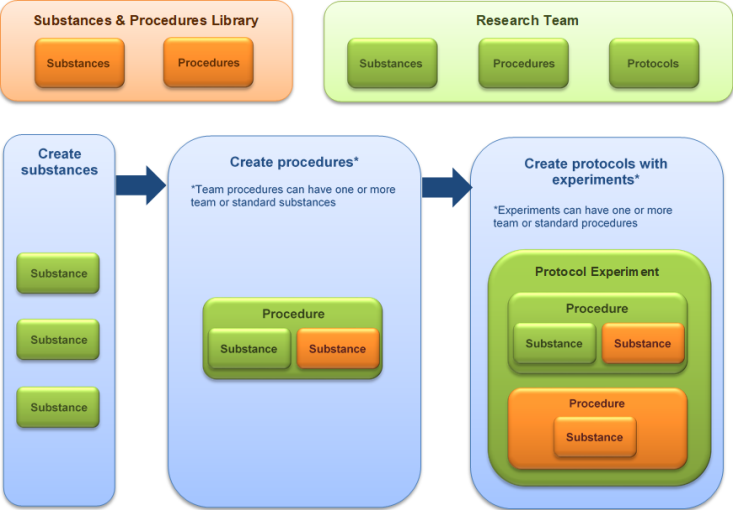
You can view a protocol's experiments in several ways:
- On the Experiments page of the protocol click the experiment name to see the details.
- Click any procedure name to see its details on a separate browser tab.
Tips:
- The procedure name indicates whether it is a standard or team procedure so you can easily identify the institution approved procedures (standard) from those created by the research team.
- A team procedure referenced by at least one approved protocol is prefixed with a check mark so you can easily identify a team procedure that has already been reviewed by the IACUC.
- You can view procedures with a check mark prefix:
- On the Experiments section of the SmartForm
- In the procedure details on the left-navigator
- When creating or editing an experiment
- Under the Experiments tab on a submission workspace
- On the submission workspace, click the Experiments tab to see a list of experiments sorted in the specified display order along with the procedures and substances included in the protocol.
- Click a procedure or substance to view it in a separate browser tab.
View procedure changes
- From the submission workspace, click Review…/View... (Review/View Amendment or Review/View Triennial Review).
Click the link in the "Click here..." message. Note: For an Amendment, the link is available on the Summary page, whereas for a Triennial Review the link is available on the Triennial Review Introduction page.
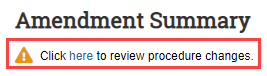
- You will be redirected to the submission SmartForm.
- On the left Navigator, click the Experiments page and review the list of procedures. The pencil icon indicates any procedure pages that have changed.
View documents attached to a submission
- As you look through the submission pages, when you come across an attached document, click the name of a document to open it.
- On the submission workspace, click the Documents tab to see a list of all the documents attached to the submission. Click the name of the document to open it.
Print submission pages
- In the submission workspace, click Printer Version on the left and select one or more of the printer packet options.
- Click Print.
Tip: With the printer version displayed, you can search it by pressing CTRL+F or Command+F (Windows and Mac shortcut keys, respectively) and typing your search term. You can also view a particular section by clicking a link in the Table of Contents. - Click Print at the top to send it to your default printer.
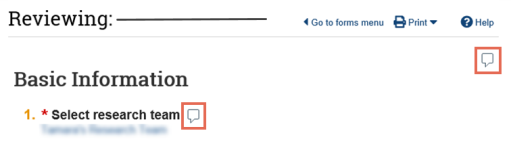
Add reviewer notes to submission pages (for DMR)
- From My Inbox, click the name of the submission to open it.
- Click Review... (Review Protocol, Review Amendment, etc.) on the left of the submission workspace.
- Navigate to a page or field where you want to add a note and click the note icon. Note: You cannot add reviewer notes to a specific procedure or substance in a submission. Instead, add a note on the Experiments page, or select the experiment and then add reviewer notes to the appropriate fields for that experiment.
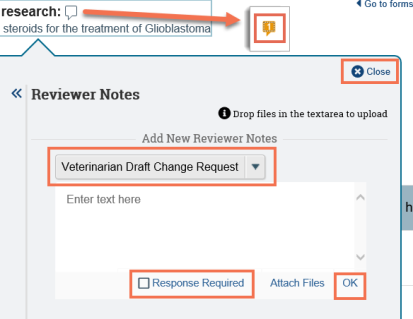
- From the drop-down list, choose a note type. You may only have one option, which will be selected by default.
Note: The note is considered "draft" until you submit the request for clarification or approve the submission with modifications required. Once submitted, you won't be able to edit your reviewer notes, but you can view them.
- Type your comments, questions, or change requests in the box.
- Select the Response Required check box if you require the PI to respond to the note. If selected, the submission will not be able to move forward in the workflow until the PI has responded to the note.
- Click OK at the bottom to save your note, and then click Close at the top of the note.
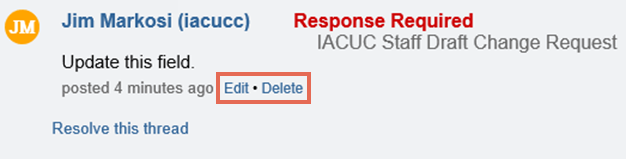
- The note icon appears orange with a red dot (indicating that response is required for this note) and a number indicating the number of notes added to the page or field.
Tip: If you need to update or change what you just wrote, click the orange note icon and then click Edit or Delete in the note. The “Resolve this thread” link closes the note to further edits. Notes that require a response from the PI cannot be resolved until the PI responds to them.
- Use the Left Navigator to move through submission pages and add reviewer notes as needed.
- When finished adding notes, click Exit to return to the submission workspace.
Note: For designated reviews, if a designated reviewer is assigned to communications, only that reviewer can perform the following steps. Otherwise, this is available to all designated reviewers.
Send change requests to PI
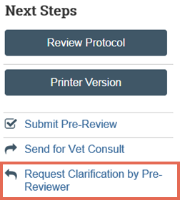
- From the submission workspace, click Request Clarification.
- In the Request Clarification form, type your comments or general request for changes to the submission.
Note: You can also attach documents that explain your comments, show examples or screen captures of problematic areas, or provide suggestions for resolving the problems. - Click OK to submit your clarification request. The protocol team receives an email notification about the clarification request.
Note: To preserve the anonymity of committee members, protocol team members will not be able to see the committee member’s name in clarification request activities in the submission history. IACUC staff members and committee members will see two activities in the submission history, one with the committee member’s name and the other with the author of “System Administrator.” - Reviewer notes are removed from the submission’s history whenever the submission is discarded or withdrawn.
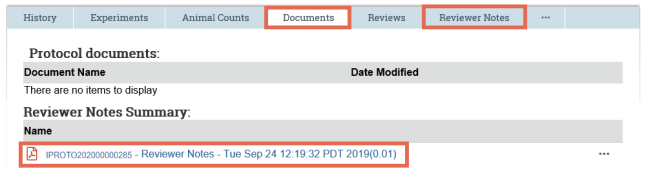
- If your institution retains reviewer notes upon approval as per IACUC settings, the reviewer notes are compiled into a PDF document that is placed on the submission's Documents tab. The Reviewer Notes tab is no longer visible after approval.
- When a follow-on submission is approved, it will not retain reviewer notes on its workspace instead the reviewer notes are stored on the parent protocol's workspace.
- You will receive an email notification when the protocol team submits their response to your clarification request (unless the submission is in Full Committee Review).
View Changes to a Submission
If the protocol team made changes to their submission in response to your clarification request, you should determine what changed since you last reviewed it. You can view the changes to a submission in the following ways:
- View responses to a clarification requests: Review the responses and comments to your reviewer notes.
- View change log: Review all changes made to the submission by person and date. Note: The Change Log shows changes only after the submission has entered Pre-Review state. For approved protocols, the Change Log shows only the changes made on the initial submission. Changes from amendments show on the Change Log for a particular amendment.
- View changes between two versions: Compare and review the previous and latest version of submissions.
View responses to a clarification request
From My Inbox, click the name of the submission to open it.
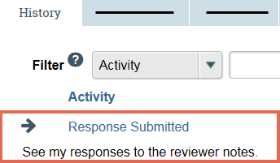
Click the History tab.
In the Activity column, look for Response Submitted and any comments the PI may have added.
If you added reviewer notes to the submission, click the Reviewer Notes tab on the submission workspace. For each reviewer note, click the Show…Reply link and review the PI's response to your note.
To view the submission page related to the reviewer note, click the page or question link.
When done, exit the submission.
Tip: From within the submission, you can click the note icons on the Left Navigator to move to the next reviewer note in the submission
View the Change Log
- From My Inbox, click the name of the submission to open it.
- In the submission workspace, click the Change Log tab. The tab lists the protocol page, the item on the page that changed, the original and new values, who made the change, and when.
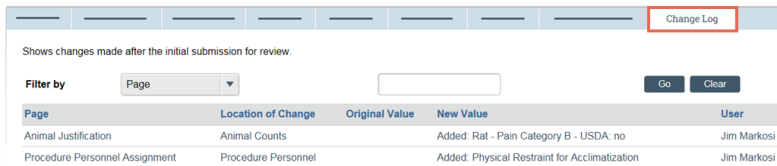
Tip: Use the Filter by feature to find specific data.
View changes between two versions of a submission
- From My Inbox, click the name of the submission to open it
- Click Review... (Review Protocol, Review Amendment, etc.) on the left of the submission workspace.
- On the top of the Left Navigator, click the down arrow to select the version to compare to the current version.
- On the Left Navigator, look for the edit icons. These indicate that the page changed between the current and selected version. Click the page name to jump to that page to view the differences.
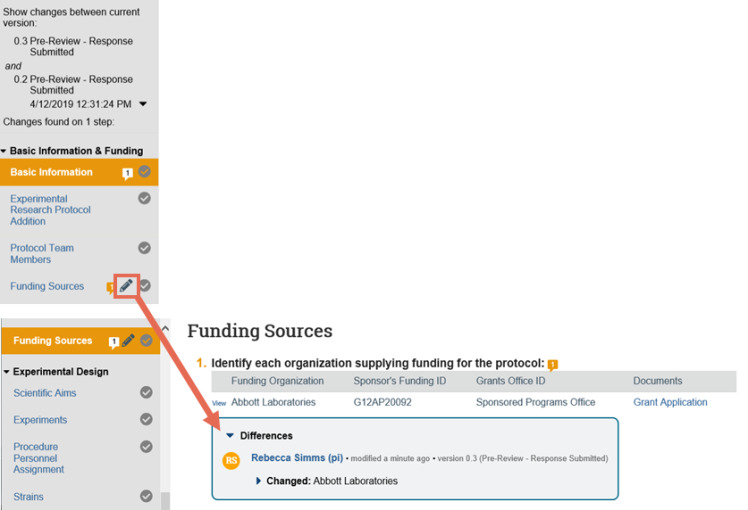
5. In the Differences note, click the arrows to show the details and new and old values. The changes appear as follows:
- Added text is highlighted in green
- Deleted text is highlighted in red with a line through it

6. After you have finished viewing all the pages that have changed, click Exit at the bottom right to return to the submission workspace.
Important: You have not submitted your review yet. When you are ready, submit your review from the submission workspace.
Add comments to the submission
- From My Inbox, click the name of the submission to open it.
- Click Add Comment to add a comment that all IACUC users can see or Add Private Comment to add a comment that only assigned reviewers can see.
- Type your comments.
- Select any roles related to this submission that should receive an email notification, when you click OK. No one will receive duplicate email messages about your comment.
- Click OK.
Submit an ancillary review (Pre-Review)
- You should have received a notice from the system and an attached form “Pre-Review Worksheet.” From My Inbox, click the name of the submission to open it.
- Click Submit Ancillary Review on the left side of the submission workspace.
- Select the review you are completing from the list.
- Indicate whether you think the submission is acceptable as it is currently written.
- Please use the worksheet to record your comments, and then attach the filled-in worksheet when you have completed your review. If you have no comments, please reply "No comments" and submit.
- Click OK.
- The review comments are shown in the protocol history.
Submit a Designated Member Review (DMR)
After reviewing a submission, you must submit your review decision in the system. This step completes the review and moves the submission forward in the IACUC process.
If you feel the submission should be reviewed by the full committee, do not submit your designated review. Instead, assign the submission to committee review using the Assign to Committee Review activity. If any designated reviewer does this, the submission moves to the Meeting Assignment state, thereby ending the designated review.
Tips:
- If the information entered for pre-review is inaccurate, contact the IACUC coordinator to request a change. The coordinator can change some of the pre-review information until the decision from designated or committee review is submitted. Make sure it is corrected before you submit your review decision.
- You can include comments when you record your decision. If you need the research team to answer a question before you can record a decision, request submission clarifications.
Note: The procedure below assumes that the protocol team has completed any clarification request and responded to all reviewer notes that require responses.
- From My Inbox, click the name of the submission to open it.
- Click Submit Designated Review on the left side of the submission workspace.
- Select your determination.
- If you select the Approved determination, select the approval date. Otherwise, leave it blank.
- If you require the protocol team to modify their submission to secure approval, type those details in the "If modifications are required..." box.
- If required, add any comments and attach documents related to the review.
- If you are ready to submit your decision, select Yes. Otherwise, select No, which enables you to return to this form later to edit and submit it.
- Click OK.
- The submission will remain in your inbox until all designated reviewers have submitted their reviews. When all reviews have been submitted, the submission will move forward in the review process and will no longer appear in your inbox.
Complete a Full Committee Review (FCR)
After reviewing a submission, you must submit your review decision in the system. This step completes the review and moves the submission forward in the IACUC process.
For committee reviews: An IACUC staff member can submit the decision on behalf of the committee.
Tip: You can include comments when you record your decision by making comment, or making clarification.
Note: The procedure below assumes that the protocol team has completed any clarification request and responded to all reviewer notes that require responses.
- From My Inbox, click the name of the submission to open it.
Important: An IACUC staff member can submit the decision on behalf of the committee.
Tip: If the information entered for pre-review is inaccurate, contact the IACUC coordinator to request a change. The coordinator can change some of the pre-review information until the decision from designated or committee review is submitted. - Click Submit Committee Review on the left.
- Select your determination.
If the committee approved the submission, select the approval date (this will most likely be the committee meeting date), otherwise leave it blank.
Again, if approved, select the effective date (this can be the same date as the approval date, or a future date.) Note: For initial submissions (e.g., protocols), the system will auto-populate the last days of annual and triennial approval periods based on the set effective date where.
- Last day of annual review period = Effective date + 1 year - 1 day
- Last day of triennial approval period = Effective date + 3 year - 1 day
These dates can be adjusted as needed.
If the committee decides to withhold approval or requires changes to the submission to approve it, type those details in the "Identify the modifications required..." box.
(Optional) Type the number of votes for each determination.
(Optional) Add any comments and attach documents related to the review.
Click OK.
The IACUC can now officially communicate the decision to the protocol team.